Shoulder Strength
Strong shoulders make strong bboys. If you want to be on your hands and make it look easy get comfortable being upside down. Handstands are the basics you need to master. To get to the next level start training like a gymnast and introduce rings to your workout. This article gives you a peek at how I maintain my shoulder strength to stay injury free and keep performing after 20 years of Breakdancing.
The Basics
You get stronger when you expose your body to physical stress. Your body responds by getting stronger and/or growing more muscle. The physical stress has to be sufficient enough to force your body to adapt. The key is intensity whether it is from high resistance, repetition or frequency.
Handstands are the key for Breakdancing
The first goal is to get your handstands. If you don’t have it here is a video for learning it. You may start this training despite not having a handstand although you will struggle more.- 1 minute handstand holds against the wall. I do three 1-minute holds against the wall once or twice or week to maintain my handstand strength. Give yourself about a month to work up to this level and once you have it, it is easy to maintain. Have your chest facing the wall and extend your shoulders towards the floor as much as you can. A common mistake is having a wider than shoulder width stance with your hands, keep it shoulder width and you will find it is easier. If you get tired you can rest your knees and thighs against the wall.

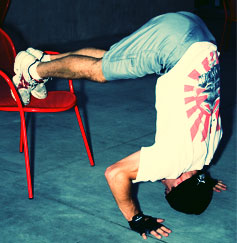
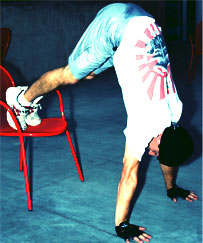
- Handstand Pushups. I do about 20 a week. You can do them on rings, against the wall or on a chair depending on your ability. More is better to a point, I don’t see much benefit after a 100 repetitions a week.
- Handstand Walking. I walk forwards, backwards side to side and do circles.
Ring Training Is the Best Way To Get Strong!
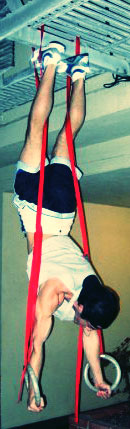
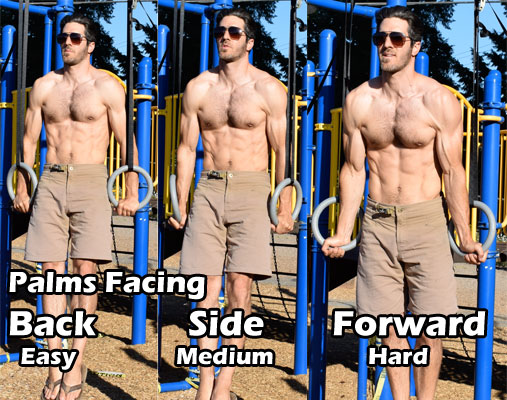
The instability of rings makes them a fast and efficient way to get strong. I do various strength positions on rings on a weekly basis. If it is available learn rings at a gymnastic gym. You can also get very great results by buying your own set of rings and following gymnastic bodies or youtube videos. Gymnastic bodies does a good job guiding you through basic gymnastic ring strength training. My ring training consists of a low ring setup at home and a high ring setup at my local gymnastics gym.- Ring Support This basic hold should be mastered. I hold it for 2 minutes in 30 second increments. As you get better strive to perform the excercise with your palms facing forwards.
- Ring Handstand Pushups Advanced move, much more difficult than regular handstand pushups and much more rewarding.
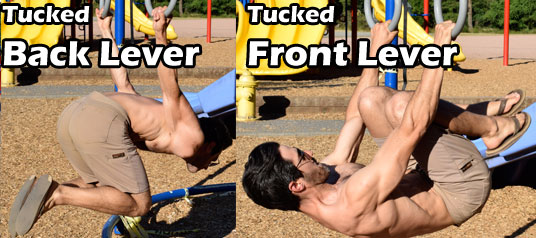
- Levers Complete upper body training that takes intense concentration. These can also be worked on any bar and beginners should try it with their knees tucked before extending the legs.

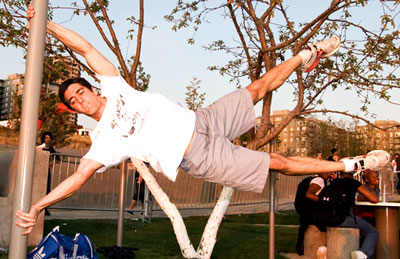
- Flags The best excercise for strong and flexible obliques. These also work the shoulder in a much different angle.
- Iron Cross Not everybody will have access to do this or be able to do it but just training for it makes your shoulders solid. Some common mistakes are bending your arms and going lower than you can control. The stronger you get the lower you will go. I use a set of iron cross trainers that let me cheat allowing me to perform the full range of motion. Perform about 3-4 sets with a low rep range of 3 to 5. We want quality and intensity.
- Maltese Another difficult move that gets you strong on the floor just training. Its an advanced move but with the cheater handles it’s doable.
Currently I split my ring training into three days and do the following:
Day 1
Four 30 second ring support holds
10 handstands on rings
30 second handstand hold on rings
Four 30 second ring support holds
10 handstands on rings
30 second handstand hold on rings
Day 2
15 front and back levers
3 flag holds both sides
Day 3
30 ring pushups
20 Iron Crosses
30 second Iron Cross hold
10 Maltese
30 second Maltese hold
Weight Training, the Best Way To Isolate Weakness
Weight training has a proven track record across all sports. The benefit is its ability to isolate muscles and adjust the resistance. Here are some basic exercises to try.- Military Press The same motion as a handstand pushup, very good for beginners to try. You can use dumbbells or a barbell they both work a little differently. I prefer dumbbells since I can work each shoulder independently but if you want to move more weight than use the barbell.
- Arnold Press Similar to a handstand press except there is more range of motion and a twist at the end.
- Raises There are several variations that work the shoulders at different angles. Lateral raises work the side, front raises work the front and bent over raises work the rear of the shoulders. Depending what is weak dictates which exercise to use.
I perform 2-3 exercises for 3 to 4 sets, each set is 8-11 repetitions. For example:
1st Exercise Military Press Using Dumbbells
1st set 20lbs 10 repetitions
2nd set 40lbs 10 repetitions
3rd set 70lbs 8 repetitions
2nd Exercise Lateral Raises Using Dumbbells
1st set 10lbs 10 repitions
2nd set 15lbs 10 repetitions
3rd set 15 lbs 10 repetitions
4th set 20lbs 8 repetitions
Watch the Video See All the Moves (Conclusion)
If pictures aren't your thing, then watch the video. This training has been my baseline for 10 years now and my shoulder injuries have stopped. My breakdancing practice sessions are also more efficient because strength doesn't hold me back. Feel free to send me questions, its how I learn what people want to know.
Sources
The Encyclopedia of Bodybuilding By Arnold Schwarzenegger (Published over 30 years ago and still the best on the subject.)
Home Rings Pretty much any of the ones you buy will be fine. Wood ones are nice for indoors, plastic better for outdoors.
Iron Cross Trainer Excellent tool for iron cross and maltese!
Gymnastic Bodies (I learned from gymnasts but everything I have seen from these guys has been exactly how I was taught. I watch their videos to remind myself of the basics)